
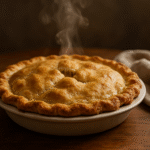
Making a perfect pie crust is an essential skill for any home baker. Whether you’re preparing a sweet pie for dessert or a savory quiche, a flaky, buttery crust is the foundation of the dish.
PrintThe Essential Pie Crust Recipe
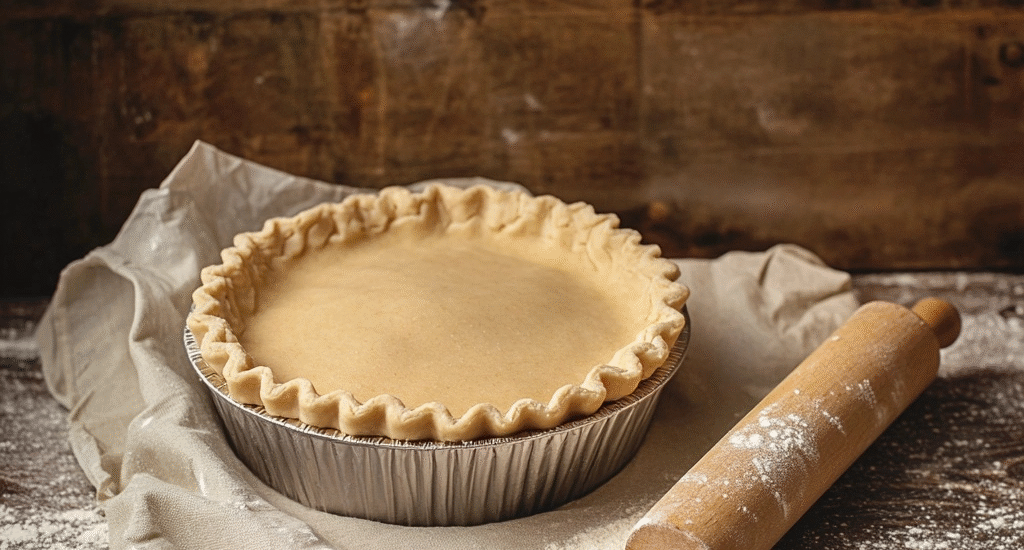
A basic pie crust is made with just a few ingredients, but it’s the technique that makes all the difference. Here’s a tried-and-true recipe with a twist—using both butter and lard for an incredibly flaky texture.
Making a perfect pie crust is an essential skill for any home baker. Whether you’re preparing a sweet pie for dessert or a savory quiche, a flaky, buttery crust is the foundation of the dish. But achieving that perfect balance of crisp, tender, and golden can be tricky. Let’s dive into the key ingredients, tips, and techniques that will help you make a pie crust that will impress every time. Click to learn why i use a combination of butter and lard instead of hydrogenated vegetable oil when making pie crust.
- Category: Pies
- Method: Oven
- Cuisine: American
Ingredients
1 1/4 cups all-purpose flour
1/2 teaspoon salt
1/4 cup unsalted butter, chilled and cut into small cubes
1/4 cup lard, chilled and cut into small cubes
1 tablespoon white vinegar
3-4 tablespoons ice water
pinch of sugar
Instructions
- Preheat oven to 375°F
-
Combine the dry ingredients: In a large mixing bowl, whisk together the flour and salt.
-
Cut in the fat: Add the chilled butter and lard cubes to the flour mixture. Using a pastry cutter, fork, or your fingertips, cut the fat into the flour until the mixture resembles coarse crumbs with pea-sized pieces of fat.
-
Add vinegar and water: Mix the vinegar into the ice water. Drizzle 3 tablespoons of this ice water-vinegar mixture over the flour and fat mixture and gently stir with a fork. Add the remaining tablespoon if necessary, one teaspoon at a time, until the dough just begins to come together. Be careful not to overwork the dough.
-
Form the dough: Turn the dough onto a lightly floured surface and gently knead it a few times to bring it together. Shape the dough into a disk, wrap it in plastic wrap, and refrigerate for at least 30 minutes before using.
-
Roll out the dough: After chilling, roll the dough on a floured surface to your desired thickness, and transfer it into your pie dish.
-
Pre-bake or fill: Depending on your recipe, either bake the crust partially (pre-bake) or fill it with your desired pie filling and bake according to the instructions.
Baking Time & Temperature:
- For Blind Baking (Pre-baking the Crust Only):
-
Preheat oven to 375°F (190°C).
-
Line the crust with parchment paper and fill with pie weights or dried beans.
-
Bake for 15 minutes, then remove the weights and parchment.
-
Continue baking for 10–12 minutes or until lightly golden brown.
(Optional: Brush with egg wash and return to oven for 2–3 minutes to seal the crust.)
-
-
For Filled Pies (Not Pre-baked):
-
Follow the baking temperature and time specified in your filling recipe—most pies bake at 375°F to 425°F for 45–60 minutes depending on the filling.
-
Yield:
-
Makes 1 single 9-inch pie crust
(For a double-crust pie, simply double the recipe.)
Notes
Why Vinegar Is Added
You might be wondering why vinegar is included in this pie crust recipe. The addition of vinegar serves a few important purposes:
-
Flakiness: Vinegar helps to inhibit gluten formation. This results in a more tender, flaky crust since too much gluten can make the dough tough.
-
Acidity: The vinegar adds a slight acidity, which helps break down the proteins in the flour, making the dough more pliable and easier to handle. It also promotes a more tender texture.
-
Crispness: The acidity from vinegar can help the crust bake up crisp and golden, preventing it from becoming too soft or soggy when it’s filled with wet ingredients.
Tips for a Perfect Pie Crust
Achieving that perfect flaky texture involves more than just the right recipe—it’s about the technique. Here are some tips to ensure your pie crust is everything you want it to be:
-
Tips for Rolling Out Pie Dough Like a Pro
-
Chill First, Roll Second
After making the dough, let it rest in the fridge for at least 30 minutes (up to 2 days). Cold dough is easier to handle and helps keep the fat solid for flakiness. -
Flour Wisely
Lightly flour your work surface, rolling pin, and the dough itself to prevent sticking. Don’t overdo it—too much flour can toughen the dough. A bench scraper can help lift the dough if it sticks. -
Start from the Center
Always roll from the center outward, turning the dough slightly after each roll to keep the circle even. This helps maintain an even thickness throughout. -
Keep It Moving
Rotate and lift the dough frequently while rolling. If it starts to stick, dust underneath with a little more flour. Don’t force it—gentle, even pressure is best. -
Aim for 1/8-Inch Thickness
That’s the sweet spot for most pies—thin enough to bake through, thick enough to hold your filling without tearing. -
Use a Guide
Roll your dough to about 12 inches in diameter for a 9-inch pie plate. A ruler or rolling pin rings can help guide your thickness. -
Roll Between Parchment Sheets
If you struggle with sticking or tearing, roll the dough between two pieces of parchment paper or plastic wrap. This makes transferring to the pie dish a breeze. -
Patch It Up
If your dough tears, don’t panic! Press it gently back together or patch with a small piece of extra dough moistened with water. -
Transfer with Care
To move your dough to the pie plate, roll it gently around your rolling pin and unroll it into the pan. Adjust gently to avoid stretching—it’ll shrink during baking if pulled too tight. -
Chill Before Baking
Once your dough is in the pan, pop it back in the fridge for 15–20 minutes before baking. This helps it hold its shape and reduces shrinkage.
-
Preventing a Burnt Pie Crust
If you’ve ever baked a pie only to find that the crust edges are burnt while the filling is undercooked, you’re not alone. Here are a few ways to prevent that from happening:
-
Use Pie Weights: When pre-baking a crust, use pie weights or dried beans to prevent the dough from puffing up and creating air pockets.
-
Wrap the Edges with Aluminum Foil: This classic trick helps prevent the crust edges from burning. Simply wrap the edges of the pie with aluminum foil, making sure to leave the center exposed. This will shield the crust from direct heat while allowing the filling to bake through. You can remove the foil in the last 15 minutes of baking for a golden, crisp edge.
-
Shiny Side Out: When using foil, make sure the shiny side is facing out. This reflects heat away from the crust and helps it bake more evenly.
-
Watch Your Oven Temperature: If you notice your crust browning too quickly, reduce the oven temperature by 10–15 degrees Fahrenheit. This will allow the filling to catch up without overcooking the crust.
How to Fix a Soggy Pie Crust
A soggy bottom can be a real disappointment, but it’s easy to avoid with a few simple strategies:
-
Blind Baking: If you’re making a pie with a wet filling, like a custard pie, pre-baking (or blind baking) the crust is essential. This creates a barrier between the filling and the dough, preventing sogginess.
-
Brush with Egg Wash: Before baking, brush the crust with a light layer of egg wash (a beaten egg mixed with a tablespoon of water). This seals the dough and creates a protective barrier between the crust and the filling.
-
Baking Sheet Underneath: Place your pie on a hot baking sheet to help the bottom of the crust cook quickly and evenly.
Final Thoughts
With the right recipe and technique, making a perfect pie crust is within reach for every baker. By following these tips and tricks, you’ll be able to create a flaky, golden crust that’s the perfect base for your favorite pie filling. Whether you’re baking for the holidays or just because, a homemade pie crust is the key to a truly special dessert.
Happy baking!
Nutrition
- Serving Size: 1/8th of a 9-inch crust
- Calories: 220
- Fat: 14
- Carbohydrates: 20
- Protein: 2