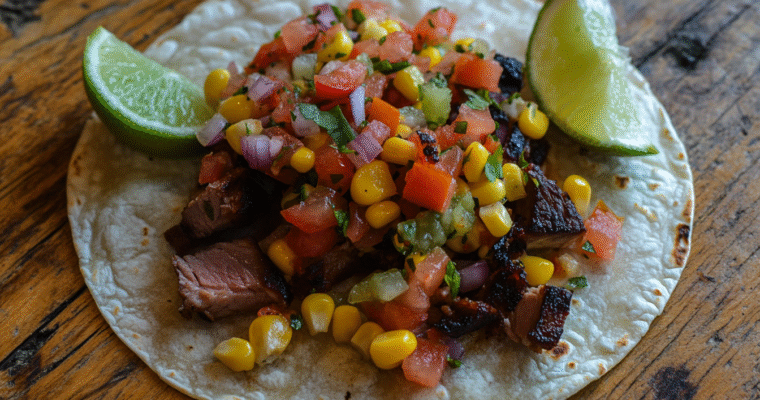
Roasted Corn Pico de Gallo
This Roasted Corn Pico de Gallo brings bold, smoky flavor with sweet roasted corn, zesty lime, and classic pico ingredients.

This Roasted Corn Pico de Gallo brings bold, smoky flavor with sweet roasted corn, zesty lime, and classic pico ingredients.
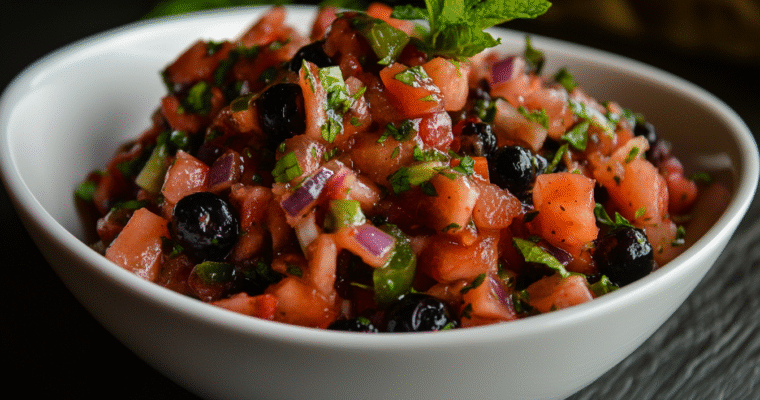
This berry twist on the classic salsa offers something completely new, and while it may be a little unconventional, it brings a refreshing approach to your recipe repertoire
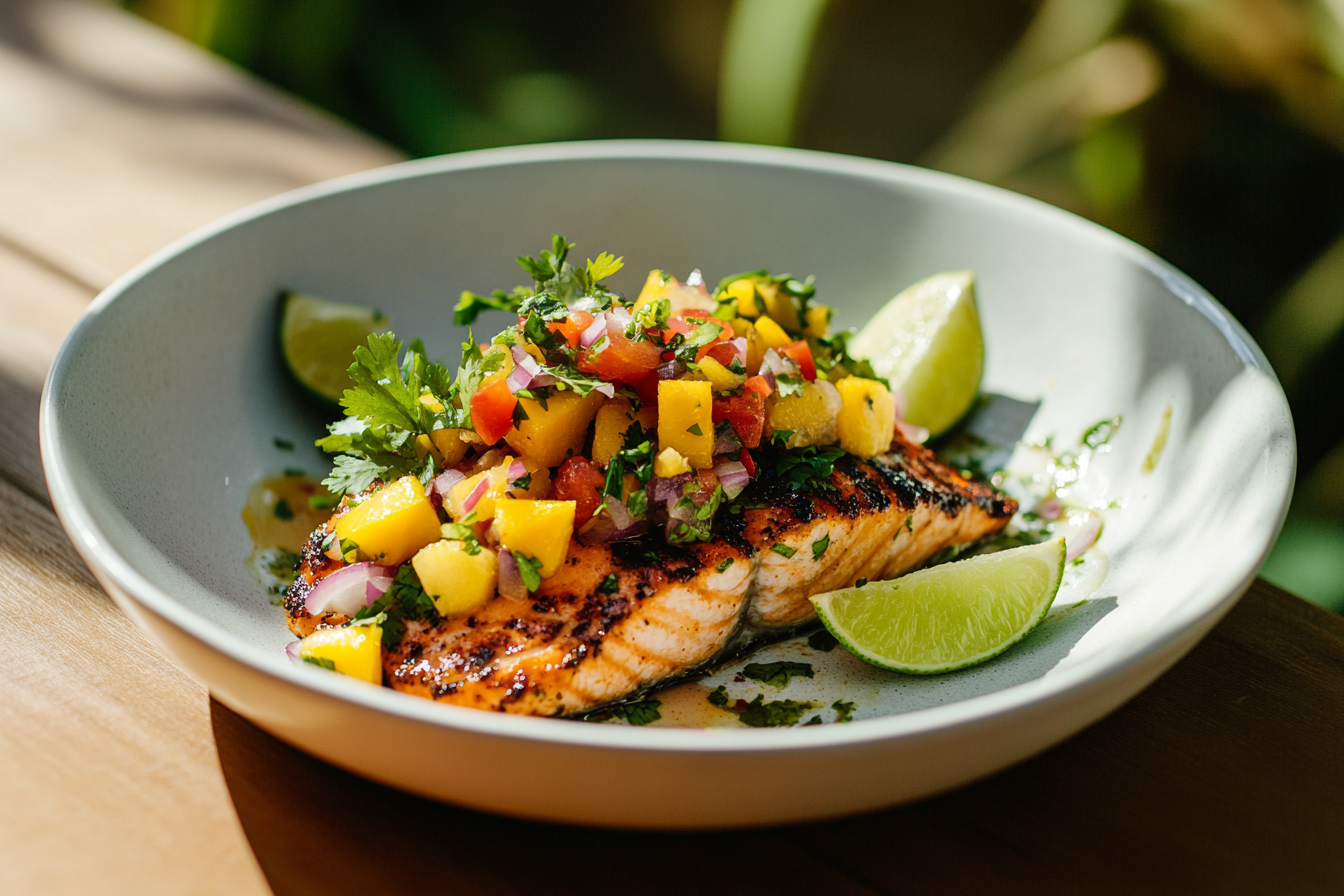
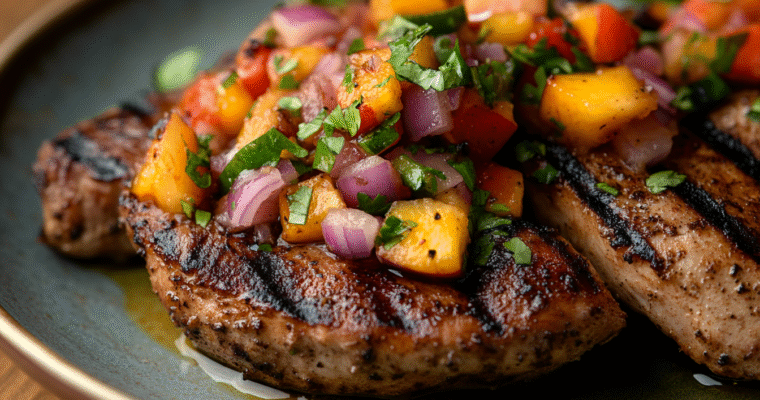
A vibrant, juicy, sweet-meets-savory salsa made with pineapple, mango, and a kick of lime—perfect for scooping with chips or spooning over grilled meats and seafood.
Print
There’s something magical about tropical flavors—they have a way of instantly transporting you to a breezy beachside cabana, no passport required. This Tropical Pico de Gallo is a vibrant, juicy twist on the classic, blending the sweet richness of mango and pineapple with the savory bite of red onion, the gentle heat of jalapeño, and a squeeze of fresh lime to tie it all together.
I first made this salsa on a whim during a backyard cookout, trying to use up some ripe fruit from the market. I didn’t expect much. But the first bite? Wow. The juicy pineapple practically sparkled, the mango added a silky sweetness, and paired with grilled shrimp—let’s just say it vanished faster than any traditional salsa on the table. Since then, it’s become my warm-weather go-to and my not-so-secret weapon for dressing up simple grilled dishes.
Whether spooned over flaky fish tacos, tucked into lettuce wraps, or served as a dip with salty chips, this fruit-forward pico delivers sunshine in every bite. It’s also totally adaptable—add avocado for creaminess, swap in papaya or kiwi, or drizzle with hot honey for an extra punch.
And while it feels like a summer treat, there’s no reason to save it just for sunny days. A little tropical sweetness can bring joy all year round.
In a mixing bowl, combine the pineapple, mango, red bell pepper, red onion, and jalapeño.
Add lime juice, cilantro, olive oil (if using), and salt. Mix gently to combine.
Taste and add sugar if the fruit is tart or if you prefer a sweeter pico.
Let sit for 10–15 minutes for flavors to meld. Serve fresh and chilled.
Wear gloves when chopping jalapeños and remove seeds for a milder pico. 🌶️
Use firm but ripe fruit for best texture—mushy fruit will make it watery.
Add a splash of olive oil when using it as a topping for grilled meats or fish—it creates a smooth, glossy finish.
Great on grilled shrimp tacos, seared scallops, or served as a fruity dip with lime tortilla chips.
Add diced avocado for a creamy twist.
Ripeness Check: Look for mangoes that give slightly when gently squeezed—like a ripe avocado. Avoid rock-hard fruit unless you’re planning ahead.
Smell the Stem: A sweet, fruity aroma near the stem is a good indicator of ripeness.
Skin Doesn’t Tell All: Red isn’t always ripe. Some ripe mangoes remain green or yellow—focus more on feel and scent than color.
Avoid Overripe: If it’s overly soft or has dark, sunken spots or a sour smell, it may be past its prime.
Wash the Mango to remove any surface dirt or sap.
Stand It Upright: The long, flat seed runs down the center. Slice about ¼ inch off each side (called the “cheeks”), avoiding the seed.
Score the Flesh: Use a knife to carefully make criss-cross cuts in each cheek, being careful not to cut through the skin.
Invert the Cheek: Push the skin side to turn the flesh outward like a hedgehog, then slice off the cubes.
Trim Around the Pit: Cut any remaining mango from the sides of the pit, then peel and dice.
Lay the Pineapple on Its Side: Use a sharp knife to slice off the top (crown) and bottom to create flat surfaces.
Stand It Upright: Slice downward along the sides to remove the skin, following the curve of the fruit.
Remove the “Eyes”: Use the tip of your knife to carve out any brown spots or eyes that remain.
Slice into Quarters: Stand the pineapple upright again, cut in half lengthwise, then in half again to make quarters.
Remove the Core: Cut off the tough inner core from each quarter—it’s fibrous and less sweet.
Dice the Fruit: Lay each quarter flat and cut into strips or cubes depending on your recipe.
💛 Taste the sunshine—whip up this Tropical Pico de Gallo and let your next bite feel like a beach getaway. Made with love, fruit, and a hint of heat. Don’t forget to tag me when you make it—I love seeing your creations! #JoyistaKitchen
Nutrition Disclaimer: The nutritional information provided is an estimate based on standard ingredients and serving sizes. Actual values may vary depending on specific products used and portion sizes. This information is provided for convenience and should not be considered medical or dietary advice
A fresh, juicy salsa made with ripe peaches, red onion, jalapeño, and cilantro—this peach pico adds a naturally sweet, tangy twist to tacos, grilled meats, or tortilla chips.
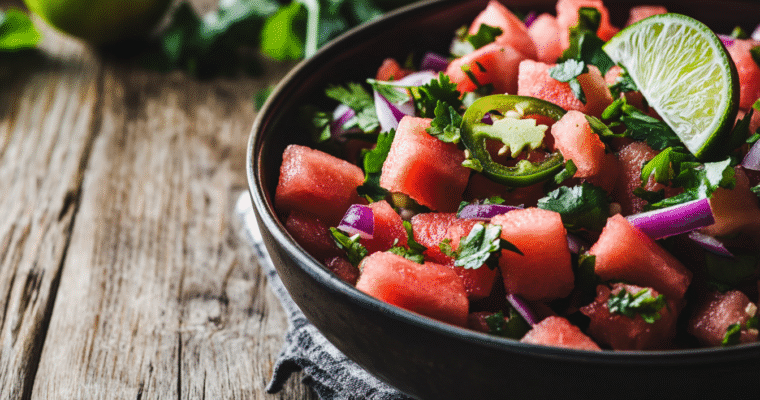
This Watermelon Pico de Gallo is a refreshing twist on the classic salsa, featuring juicy watermelon, sweet cherry tomatoes, and a zesty kick of jalapeño. A perfect balance of flavors that will surprise and delight!
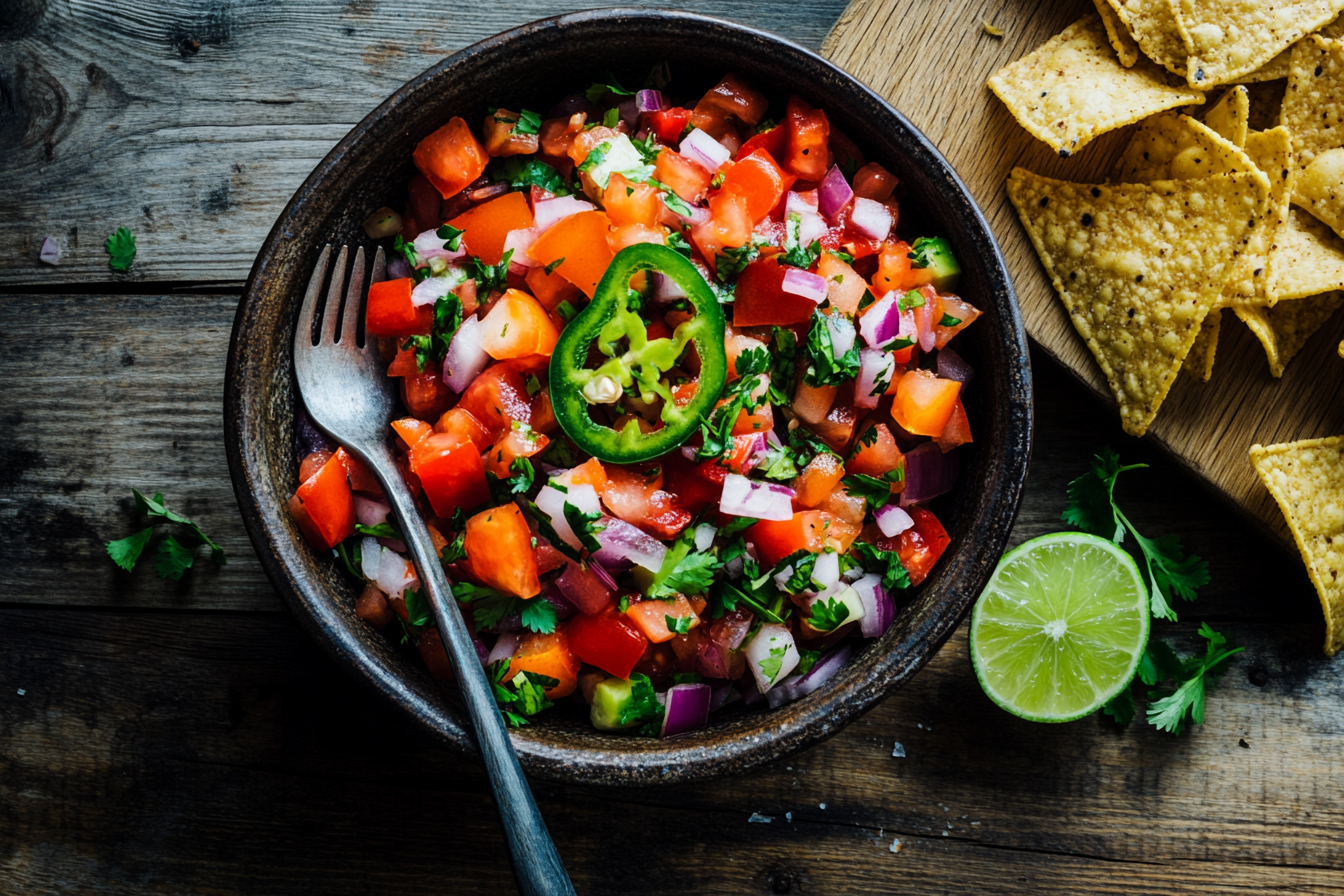
This fresh and zesty tomato Pico de Gallo is a simple, no-cook salsa made with ripe tomatoes, red onion, jalapeño, cilantro, and lime juice—perfect for dipping, topping tacos, or serving with grilled meats.
Print
There’s something timeless about a bowl of freshly chopped Pico de Gallo. It’s bright, zesty, crunchy, and loaded with flavor. This classic Mexican salsa is a staple in my kitchen and the kind of recipe that brings any meal to life—whether you’re scooping it with tortilla chips or spooning it over grilled chicken or fish.
The name Pico de Gallo literally translates to “rooster’s beak” in Spanish. There are a few theories about the origin, but one charming idea is that people used to pinch bits of the salsa between their fingers to eat it—like a peck from a beak! No matter how the name came about, what’s certain is this: it’s a bold, fresh condiment that deserves a spot at every table.
In a medium bowl, mix the diced tomatoes, onion, jalapeño, and cilantro.
Add lime juice and salt, then stir gently to combine.
If you plan to use it as a relish or topping, stir in the olive oil.
Let it sit for 10–15 minutes to let the flavors come together.
Use ripe tomatoes – This is the heart of your pico. Roma or plum tomatoes are great, but any flavorful variety works.
Add a pinch of sugar if your tomatoes or lime are too acidic.
Don’t overmix – You want those tomato chunks to hold their texture.
Chill before serving for extra freshness.
Add olive oil if serving over grilled meats or fish—it brings everything together like magic. ❤️
Serve it with tortilla chips for a fresh, crunchy snack.
Spoon over tacos, grilled meats, or a burrito bowl.
Top your scrambled eggs, omelets or avocado toast with a spoonful for a zesty upgrade.
Store any leftovers in an airtight container in the fridge for up to 2 days. Stir before serving, as some of the juice may settle at the bottom.
This is a back-pocket recipe you’ll want to keep on repeat. Add it to your taco night, backyard BBQs, or even brunch spreads. It’s proof that simple ingredients, when treated with care, can become something extraordinary. 💙
Nutrition Disclaimer: The nutritional information provided is an estimate based on standard ingredients and serving sizes. Actual values may vary depending on specific products used and portion sizes. This information is provided for convenience and should not be considered medical or dietary advice
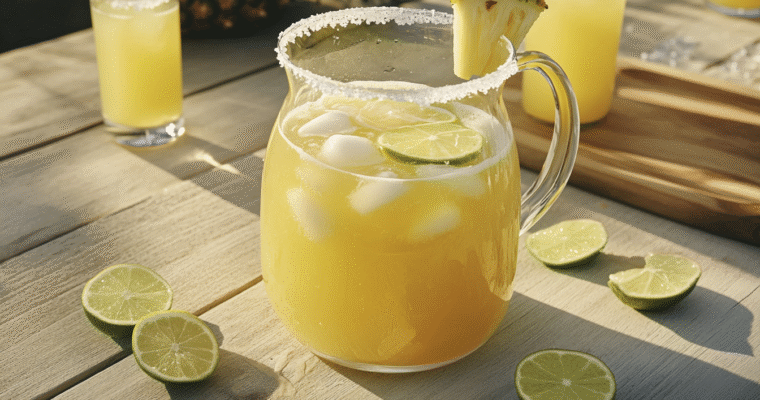
Bright, tropical, and kissed with vanilla—this dreamy drink brings sunshine to your glass, no matter the season.
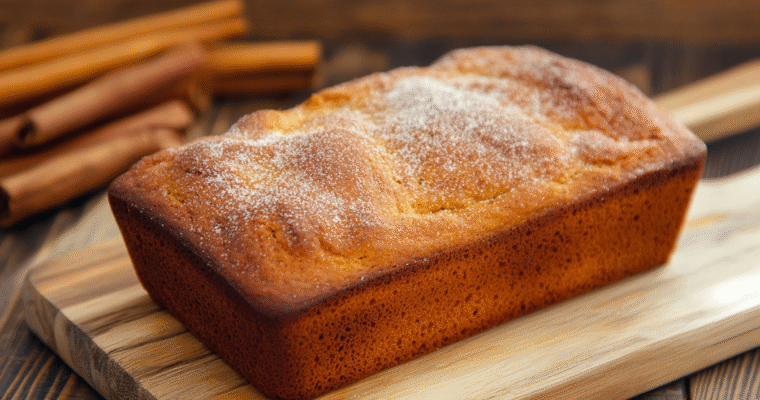
This moist and warmly spiced pumpkin bread is made with real butter for rich flavor and a tender crumb. Perfect for baking ahead, gifting, or freezing for cozy treats any time of year!
This isn’t just a bun recipe. It’s a thread that ties generations together. A bite of warmth and memory. And now — it’s yours to enjoy, too.
Print
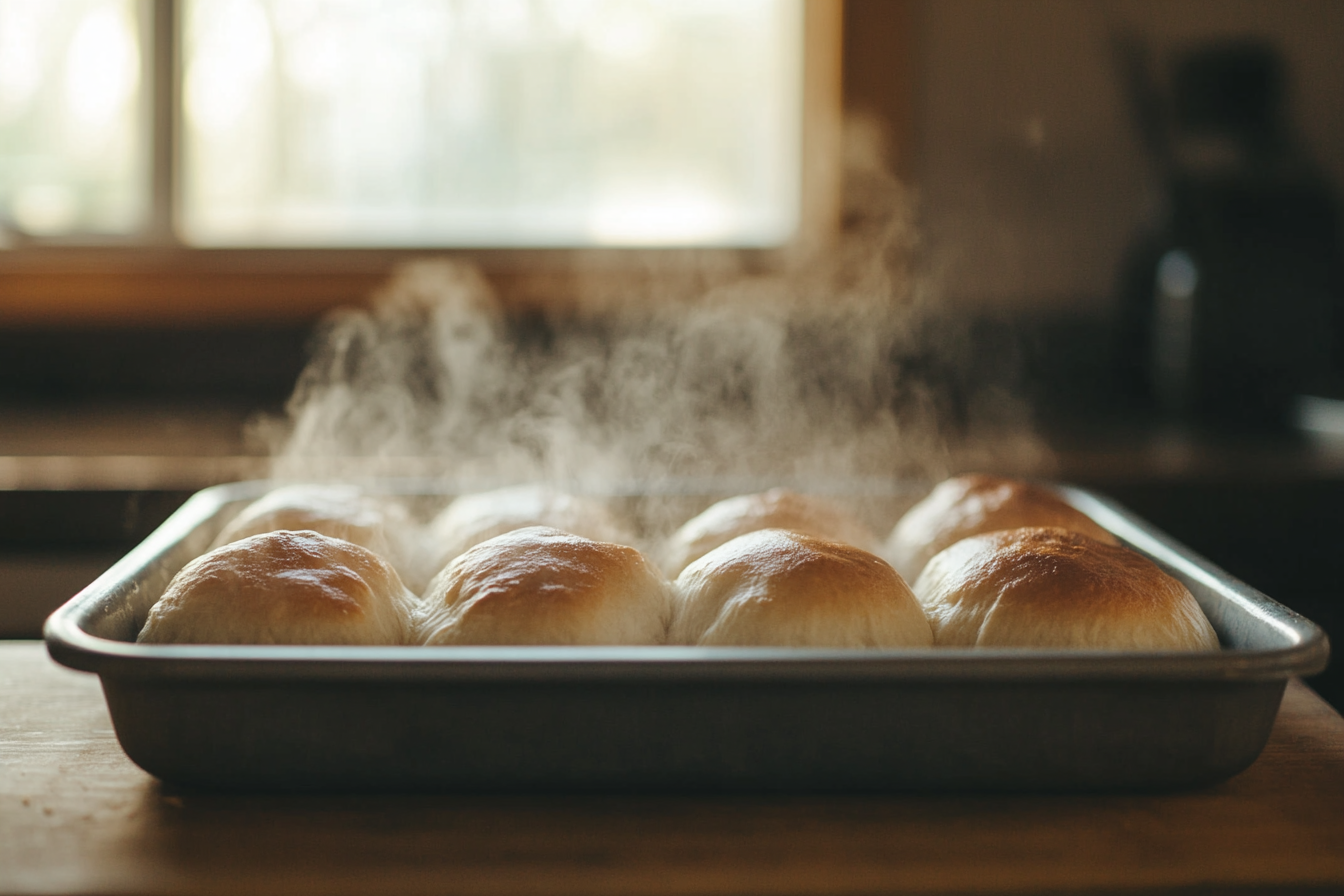
When my mom was a little girl growing up in Canada, she spent her Saturdays helping a kind neighbor named Hilde with house chores. Every Saturday, Hilde baked her famous buns—pillowy soft, lightly sweetened, and fresh from the oven. As a reward for helping, my mom would get to enjoy one warm with butter, and it quickly became one of her favorite traditions.
Over time, Hilde’s bun recipe became a treasured part of our own family’s celebrations. Whether it’s a holiday dinner or a cozy brunch, these buns always make an appearance. I’ve never found another recipe quite like this one. It does take some extra time and care—but honestly, aren’t the best things in life worth the wait?
I always keep a batch tucked away in the freezer for impromptu entertaining or a quick sandwich. They freeze beautifully, and the smell of them warming in the oven instantly brings me back to those stories of Hilde’s kitchen.
Activate the Yeast:
In a large bowl, combine warm water, 1 tsp sugar, and yeast. Let stand for 10–15 minutes until the mixture is bubbly and foamy.
Make the Starter Dough:
Stir in the scalded milk (cooled to lukewarm), 2 tablespoons sugar, and enough flour to make a soft batter (like thick pancake batter). Cover and let rise in a warm place for about 1 hour.
Add Enriched Ingredients:
After the batter has risen, stir in melted butter, sugar, beaten eggs, and salt. Gradually add flour, 1 cup at a time, until the dough is soft, elastic, and no longer sticky. (You may need to adjust the amount slightly based on humidity and flour type.)
First Rise:
Place dough in a greased bowl, cover with a clean towel, and let rise until doubled in size—about 1 to 1.5 hours.
Shape and Second Rise:
Punch down the dough and shape into buns. Place in greased muffin tins or on a baking sheet. Cover and let rise until puffy and nearly doubled.
Bake:
Preheat oven to 375°F (190°C). Bake for 18–22 minutes, or until golden brown on top.
Cool & Store:
Let buns cool slightly before serving. Store extras in an airtight container or freeze for later use.
Freezing: These buns freeze beautifully. Let them cool completely before storing in freezer-safe bags. To reheat, wrap in foil and warm in a 300°F oven for 10–15 minutes.
Yeast Note: If using instant yeast, skip the proofing step and mix directly into the dry ingredients.
Flour Amounts: The exact flour quantity may vary. Add slowly until the dough is soft but pulls away from the bowl. Trust your hands and eyes—you’ll know when it’s right.
Ready to bring a bit of heartwarming tradition into your kitchen?
Whip up a batch of Hilde’s Special Occasion Buns and share in the joy of a recipe passed down through generations. Whether it’s a cozy Sunday brunch, a holiday table, or just because—it’s always the right time for something made with love.
✨ Bake, share, and savor the joy… one soft, buttery bite at a time.
Tag us with your creations and let’s celebrate the beauty of homemade together! #JoyistaKitchen #BakingTradition
Nutrition Disclaimer: The nutritional information provided is an estimate based on standard ingredients and serving sizes. Actual values may vary depending on specific products used and portion sizes. This information is provided for convenience and should not be considered medical or dietary advice

A fizzy, college-days twist on the Long Island Iced Tea made with gin, vodka, rum, triple sec, 7-Up, and a splash of cola for that iconic “tea” hue.